Starting the MVVM pattern for SwiftUI with an example
In SwiftUI, the MVVM (Model-View-ViewModel) pattern is one of the recommended design patterns as it fits well into the declarative programming style of SwiftUI. With MVVM, data flow and UI updates can be better managed while keeping the code modular and maintainable.
Step-by-step example
First define a Model to represent the data structure
// MARK: Modelstruct Person:Identifiable { var id = UUID() var name:String = "" var sex:String = ""}Then define a ViewModel that triggers a page response. This example simulates adding, deleting and retrieving data.
// MARK: ViewModelclass PersonViewModel:ObservableObject  {
    // Person List    @Published var persons:[Person] = []
    @Published var selected:Person?
    // Query Person List    func fetchList(){        // Here it is assumed that you get the data from the server or a source such as CoreData and assign it to self.persons    }
    // Insert Person    func insertPerson(){        // Simulation of additional operations        if let person = selected {            self.persons.append(person)        }
    }
    // Update Person    func updatePerson(){        // Simulation of modification operations        if let person = selected, let index = persons.firstIndex(where: { $0.id == person.id }) {            persons[index] = person        }    }
    // Delete Person    func deletePerson(offsets: IndexSet){        // Here it is only deleted from the page list, if the data is still stored elsewhere, then it needs to be deleted together with the new related logic        offsets.forEach { persons.remove(at: $0) }    }
}
Finally the view layer is constructed, associating the data with the view via a ViewModel
// List Viewstruct SwiftUIMVVM: View {
@StateObject var personVm:PersonViewModel = PersonViewModel()
@State var showEdit = false
var body: some View {
NavigationStack { List { ForEach(personVm.persons) { person in Button(action: { personVm.selected = person showEdit = true }, label: { personView(person: person) })
} .onDelete(perform: { indexSet in personVm.deletePerson(offsets: indexSet) }) } .listRowSpacing(10) .toolbar { ToolbarItem(placement: .topBarTrailing) { Button("", systemImage: "plus") { showEdit = true } } } .sheet(isPresented: $showEdit, onDismiss: { personVm.selected = nil }, content: { NavigationStack { PersonEditView() .environmentObject(personVm) } .presentationDetents([.medium])
}) }
}
// Display list information for each person // Here we have abstracted the code to increase its readability func personView(person:Person) -> some View { VStack{ HStack{ Text("Name") .fontWeight(.thin) Text(person.name)
Spacer() } HStack{ Text("Sex") .fontWeight(.thin) Text(person.sex)
Spacer() } } }
}
// Add/Edit View of Individual Personnel Informationstruct PersonEditView: View {
@Environment(\.dismiss) var dismiss
@EnvironmentObject var personVm:PersonViewModel
@State var name:String = "" @State var sex:String = "Man"
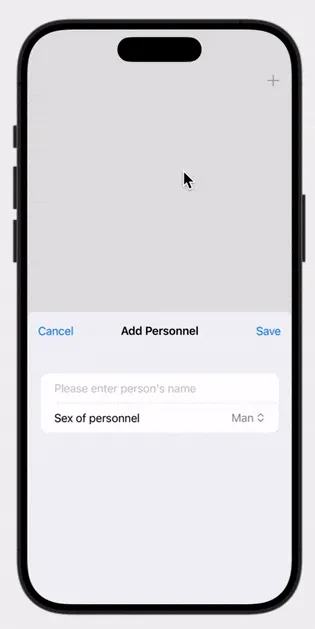
var body: some View { Form { TextField("Please enter person's name", text: $name)
Picker("Sex of personnel", selection: $sex) { Text("Man") .tag("Man") Text("Woman") .tag("Woman") }
} .navigationTitle("\(personVm.selected == nil ? "Add" : "Edit") Personnel") .navigationBarTitleDisplayMode(.inline) .toolbar { ToolbarItem(placement: .topBarLeading) { Button("Cancel") { dismiss() } }
ToolbarItem(placement: .topBarTrailing) { Button("Save") { var isUpdate = true if personVm.selected == nil { isUpdate = false personVm.selected = Person() } personVm.selected?.name = name personVm.selected?.sex = sex
if isUpdate { personVm.updatePerson() }else{ personVm.insertPerson() }
dismiss()
} } } .onAppear { if let person = personVm.selected { self.name = person.name self.sex = person.sex } } }
}Full Code
Here is the full code:
import SwiftUI

// MARK: Modelstruct Person:Identifiable {    var id = UUID()    var name:String = ""    var sex:String = ""}
// MARK: ViewModelclass PersonViewModel:ObservableObject  {
    // Person List    @Published var persons:[Person] = []
    @Published var selected:Person?
    // Query Person List    func fetchList(){        // Here it is assumed that you get the data from the server or a source such as CoreData and assign it to self.persons    }
    // Insert Person    func insertPerson(){        // Simulation of additional operations        if let person = selected {            self.persons.append(person)        }
    }
    // Update Person    func updatePerson(){        // Simulation of modification operations        if let person = selected, let index = persons.firstIndex(where: { $0.id == person.id }) {            persons[index] = person        }    }
    // Delete Person    func deletePerson(offsets: IndexSet){        // Here it is only deleted from the page list, if the data is still stored elsewhere, then it needs to be deleted together with the new related logic        offsets.forEach { persons.remove(at: $0) }    }
}
// List Viewstruct SwiftUIMVVM: View {
    @StateObject var personVm:PersonViewModel = PersonViewModel()
    @State var showEdit = false
    var body: some View {
        NavigationStack {            List {                ForEach(personVm.persons) { person in                    Button(action: {                        personVm.selected = person                        showEdit = true                    }, label: {                        personView(person: person)                    })
                }                .onDelete(perform: { indexSet in                    personVm.deletePerson(offsets: indexSet)                })            }            .listRowSpacing(10)            .toolbar {                ToolbarItem(placement: .topBarTrailing) {                    Button("", systemImage: "plus") {                        showEdit = true                    }                }            }            .sheet(isPresented: $showEdit, onDismiss: {                personVm.selected = nil            }, content: {                NavigationStack {                    PersonEditView()                        .environmentObject(personVm)                }                .presentationDetents([.medium])
            })        }
    }
    // Display list information for each person    // Here we have abstracted the code to increase its readability    func personView(person:Person) -> some View {        VStack{            HStack{                Text("Name")                    .fontWeight(.thin)                Text(person.name)
                Spacer()            }            HStack{                Text("Sex")                    .fontWeight(.thin)                Text(person.sex)
                Spacer()            }        }    }
}
// Add/Edit View of Individual Personnel Informationstruct PersonEditView: View {
    @Environment(\.dismiss) var dismiss
    @EnvironmentObject var personVm:PersonViewModel
    @State var name:String = ""    @State var sex:String = "Man"
    var body: some View {        Form {            TextField("Please enter person's name", text: $name)
            Picker("Sex of personnel", selection: $sex) {                Text("Man")                    .tag("Man")                Text("Woman")                    .tag("Woman")            }

        }        .navigationTitle("\(personVm.selected == nil ? "Add" : "Edit") Personnel")        .navigationBarTitleDisplayMode(.inline)        .toolbar {            ToolbarItem(placement: .topBarLeading) {                Button("Cancel") {                    dismiss()                }            }
            ToolbarItem(placement: .topBarTrailing) {                Button("Save") {                    var isUpdate = true                    if personVm.selected == nil {                        isUpdate = false                        personVm.selected = Person()                    }                    personVm.selected?.name = name                    personVm.selected?.sex = sex
                    if isUpdate {                        personVm.updatePerson()                    }else{                        personVm.insertPerson()                    }
                    dismiss()
                }            }        }        .onAppear {            if let person = personVm.selected {                self.name = person.name                self.sex = person.sex            }        }    }
}
#Preview {    SwiftUIMVVM()}
Summaries
MVVM inside our example, respectively:
M(Model):
Personis responsible for the data structure and is fully decoupled from the view layer
V(View): TheSwiftUIMVVMandPersonEditViewviews, which implement theViewprotocol, are responsible for displaying data
VM:(ViewModel): APersonViewModelthat implements theObservableObjectprotocol and is responsible for managing data and business logic.
Extensions
A brief mention of the knowledge points we use inside the code
1. ObservableObject
An ObservableObject is a protocol by which a class that adheres to it can publish changes to its properties to a SwiftUI view, enabling the view to automatically re-render itself when the data changes.
- How it works: a class that follows
ObservableObjectnotifies views that depend on this class by publishing the properties (usually using the@Publishedtag). When these properties change,SwiftUIautomatically re-renders the view. - Usage Scenario: Typically used for
ViewModel, which is responsible for managing data and business logic in theMVVMmodel. TheObservableObjectensures that these changes are captured by the view in real time.
2. @Published
@Published is a property wrapper that marks a property in ObservableObject to indicate that any view that depends on this property is notified of updates when the value of this property changes.
-
How it works: When the value of a
@Publishedproperty changes,ObservableObjectautomatically publishes an update notification to all listening views, which re-render based on the new data. -
Usage Scenario: Where you need to be automatically notified of UI updates when data changes, such as commonly used when dealing with business logic or data operations in
ViewModel.
3. @EnvironmentObject
@EnvironmentObject is a special kind of property wrapper in SwiftUI that allows us to inject a global ObservableObject instance into an App and share it across multiple views without having to manually pass it through each view.
-
How it works: We can inject an object into the environment using
environmentObject(_:)in one of the parent views, and the child view accesses this shared object via the@EnvironmentObjectproperty wrapper. It’s particularly good for sharing state between multiple hierarchical views without the need to tediously pass data manually. -
Usage Scenario: Used to share global state between different views of an App. For example, it is especially useful when sharing user data, settings, or other global state across multiple pages of an App.